March 24, 20206 yr For those who didn't know, the Charger wreck used in Episode 4 "Repo Men" was the same car that made the jump at the very end of the show's opening credits. LOVED this car the first time I saw it as a kid, did not know how important it was until decades later. Replicating this wreck in 1/25 will be a VERY ambitious project.
March 24, 20206 yr Author If I can't replicate the body damage, the entire project is pointless. If I only heat up and bend the plastic body it will look toylike, as the body thickness when scaled up would be akin to a couple inches thick. Not convincing at all. THE SOLUTION: Make aluminum foil copies of the body sections to be damaged. Let's try it on the hood first:
March 25, 20206 yr Author Once damaged to taste, the foil is filled from behind with tons of gap-filling superglue and plastic strip reinforcements. Then to the body itself, the same treatment but MUCH bigger. LOTS of superglue to fill it all from behind. Then priming and sanding in appropriate areas.
March 25, 20206 yr Author The interior needs special work. From what I can see in the episode, the interior panels under the rear windows were removed along with the back seat, although I've read that only the seat was removed to install the full roll cage. So, I had to remove the rear panel and totally rebuild it as the interior structure that the panel would normally cover. Was a 2 full day scratchbuilding job, daunting at first but well worth it in the end. The carpet will be well worn and stained soon.
March 25, 20206 yr It took me a while to see where you were going with all that hole cutting, but the finished article makes perfect sense. Great work as usual. I look forward to seeing this build develop.
March 25, 20206 yr This leaves me speechless. We are in the midst of greatness. You have the hands of a surgeon, the skills of a master craftsman and the passion for Hazzard of a genuine Duke boy. I'm calling my best friend and telling him he's been replaced. What a super fan! Thanks for sharing this and it will fun be fun to see it evolve. Edited March 25, 20206 yr by RogerDuke
March 27, 20206 yr Author Roger, I am very moved and humbled by your words....speechless, even. I can only offer my sincerest thanks and appreciation!
March 27, 20206 yr Author I've never taken as much trouble as this for the accurate steering wheel, but here's what I finally accomplished:
March 29, 20206 yr Author ROLL CAGE Tip: Do NOT use the roll cage from the MPC "General Lee" for this project. Wrong style, wrong design, wrong size. I also found some drawings online which purport to be the actual design sketches for the original. They do match what I see in all the photos.
March 29, 20206 yr Author Here's how the scratchbuilding went, using 1/16" rod for the frame and tubing fitted over the rod for the padded sections around the driver's side:
March 29, 20206 yr Cool stuff. It was neat to see that it was displayed at a car show. Is that a reflection of you above Cooter?
March 29, 20206 yr Author LOL yep...I'm still too low-tech to be able to do screen-grabs from the TV. I'm sure the capability is there in what I've got, but just need to be shown how to use it. More importantly, I need to care enough to upgrade....but I just do what works for what I need.
March 30, 20206 yr You actually look a little like me.....not really sure since it wasn't a great picture. Contrary to popular belief I don't look like Uncle Jesse...even though I hope to someday.
March 30, 20206 yr Author I could've lied and either said no, it was really me in the General ...or, that faint image is really the Ghost of General Lee
April 1, 20206 yr Author FRONT BUMPER Need the front bumper to look like bent metal, and not a bent plastic model part. Made an aluminum foil cast of the central section; removed that plastic, attached the ends to the foil cast. Very carefully bent and dented it to match the photos. Filled with CA glue with wire reinforements for the structure. Primed, will be coated with Alclad chrome tomorrow or Thursday.
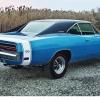
April 1, 20206 yr Author Final bodywork touchups and priming, and ready for paint. Tough to match the exact color, since in the episode (the way I'm making it) it was disguised/obscured with gray scratchwork all over it, and the recovered wreck was apparently quite weathered and faded. Did the best I could. Finally settled on a mix of 5 different blues and greens. It's actually darker than the photos show.... I settled on: 2 parts Testors Gloss Dark Blue (#1111); 2 parts Testors Dark Beret Green; 1 part Model Master Dark Sea Blue; 1 part Testors Gloss Green; 1 part Gloss Light Blue.
April 1, 20206 yr It's pretty cool to watch unfold before our very eyes. I'm sure you're right about being tough to match the paint up but if anybody can do it it's you. You're our Arte Bender.
April 5, 20206 yr I think I'd find it tough to deliberately add damage to such a pristine paint job, but as usual, you nailed it!




Join the conversation
You can post now and register later. If you have an account, sign in now to post with your account.
Note: Your post will require moderator approval before it will be visible.