Andrew D Charger Chaser
-
Posts
440 -
Joined
-
Last visited
-
Days Won
34
Content Type
Profiles
Forums
Gallery
Episodes
Events
Everything posted by Andrew D Charger Chaser
-

Daisy's Plymouth -- WIP
Andrew D Charger Chaser replied to Andrew D Charger Chaser's topic in Hobbies
One more for today. For the filming, all identification logos/scripts on the vehicles were removed (i.e. all the "Charger" logos, the "FORD" from above the grill and tailgate on Jesse's truck, "PLYMOUTH" and "DODGE" from the Sheriff cars, etc). Most of this is easy for Daisy's Plymouth, except for the grill and in front of the hood. We'll deal with the grill later. For the removed emblem in front of the hood, there is a recessed area that was left untouched once the emblems were removed, and then painted over. I tried removing the bit inside the recessed circle with a roto-drill, but I couldn't make it into a flat disc surface. So I cut a tiny circle of sandpaper, smaller than the target area, and glued it to the end of a toothpick. This, with a tiny dab of putty, exactly did the trick. There was CONSIDERABLE bodywork to be done with the Front Body Pan; this appears seamless with the rest of the body, so I wanted to install it before painting. The rear one will be blended in after assembly and carefully retouched. Additionally, the Front bit didn't completely fit, and the trim around the wheel well had to be rebuilt onto it and everything blended together. -
Daisy's Plymouth -- WIP
Andrew D Charger Chaser replied to Andrew D Charger Chaser's topic in Hobbies
Thanks Hoss! Turned into a major research project; had no idea it would be as challenging as it's been so far with all the modifications..... -
Daisy's Plymouth -- WIP
Andrew D Charger Chaser replied to Andrew D Charger Chaser's topic in Hobbies
Hollywood almost always uses more than one copy of any featured vehicle due to tight filming schedules plus mechanical issues. Some features on these cars are often fictional. This said, in my Dukes builds I try to balance or combine the sometimes fictional features with reality. I went through all the episodes in question searching for even one photo of the hood up on Daisy's car, maybe parked in front of the farm with the boys doing some minor maintenance. Couldn't even find one; this actually made things easier; it means whatever I do can't be proven wrong. I did find one scene with the hood up on the earlier-used '74, from the episode "Limo One is Missing," but of course it was the wrong car, and we couldn't see much anyway. It was suggested that Daisy's character might have driven the Plymouth variant with the smaller engine, with a blue engine block. I'm not sure if any muscle car kits actually offer smaller, "tamed" small-block engines, so I went with what I had. Had to strip the paint and redo it in a more correct color. I added a few details for the wiring, plus an aftermarket set of belts and pulleys. Alternator came from Revell's '68/69 Charger. There will be more hoses and wiring added after it's installed. I also removed the molded-on battery and water reservoir from the engine bay. See, the trouble with molded-on details is that they LOOK molded on, and therefore more toylike. So once removed their respective areas were rebuilt. Those specific items will have separate items installed to replace them. -
Daisy's Plymouth -- WIP
Andrew D Charger Chaser replied to Andrew D Charger Chaser's topic in Hobbies
Under expert automotive guidance from the good folks at Modelcarsmag.com forums, I procured a Revell '71 Plymouth GTX as the base kit, and ordered the correct hood from Harts Parts resins. I decided to make this a fully detailed build rather than the "curbside" closed-hood builds I've done for much of my Dukes of Hazzard fleet. It will feature a fully super-detailed engine bay, similar to what I did with The General. -
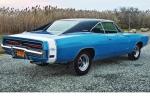
Okay, on to my next project: Daisy's Plymouth! I much prefer the look of the SECOND car used, the one that went over the cliff (actually I prefer how it looked BEFORE, but nevermind). It just looks sleeker to me, plus it was used in more episodes (14 vs 9). First, let's dispel some rumors and falsehoods: -Rumor # 1: Daisy's second car was a Plymouth Roadrunner, either '71 or '72 depending on where you read. -The Truth #1: Apparently it was probably a '71 Plymouth Satellite Sebring with some '71 GTX features including a non-Sebring hood. Therefore, it shall henceforth be referred to simply as "Daisy's Plymouth". -Rumor #2: Daisy's first car ('74 Plymouth Satellite) was only used in the first five episodes, the ones filmed in Georgia. -The Truth #2: Actually, the '74 Satellite was retained for the first four California Episodes (Swamp Molly, Luke's Love Story, The Big Heist & Limo One is Missing). The Sebring/GTX's first appearance was in Episode 11, "Money to Burn." It made a nice first entrance on this episode. It finished the first season, and was used in 14 episodes of Season 2. -Rumor #3: Except for the dive off the cliff, Daisy's car was never really used much for stunts. -The Truth #3: Actually, besides spinning wheels and fishtailing to Daisy's fantastic driving, it was used for a jump in Season 2 Episode 2, "Gold Fever". Additionally, before its tragic dive off the cliff to destruction, it did a 2-wheel bank between the Hazzard Sheriff cars.
-
Jeez Rog....I'll keep you in prayer that you'll come through this okay....
-
Another from Rosco, from "Lawman of the Year": "Ugly baby! He fell through an ugly tree and hit every limb...."
-
I actually made a huge list of "Waylonisms" that takes up several pages, too long for here. But two from Rosco: "I caught them fighting like the third monkey on the gangplank of Noah's Ark!" (S4E1 "Mrs Daisy Hogg") Or: Cooter: "Well, what brings you out so early, Boss?" Rosco: "I'll tell you what brings him out. He knows you’re an early bird, and with him being a worm, he plans on catching you.” (S5E19 "Welcome Back Bo 'N Luke")
-
Ultimate Cooter's Tow Truck -- WIP
Andrew D Charger Chaser replied to Andrew D Charger Chaser's topic in Hobbies
Okay, finally time for the COMPLETED item, my Ultimate Cooter's GMC Tow Truck! Only complaint is the decals on the door are 'way too oversized, but they were the only ones I've been able to find in years of looking. -
Ultimate Cooter's Tow Truck -- WIP
Andrew D Charger Chaser replied to Andrew D Charger Chaser's topic in Hobbies
Y'all are amazingly kind with your comments! Also, I forgot to mention the dually wheels are resin items I got on Ebay which match exactly the ones on the real thing. -
Ultimate Cooter's Tow Truck -- WIP
Andrew D Charger Chaser replied to Andrew D Charger Chaser's topic in Hobbies
In the episode "Daisy's Close Call" (S6 E19) Cooter is seen using a tool box from the rig. I can't see it in any other episode, so, being Hollywood, it probably wasn't there at any other time, not being a true "working" rig. Still, I thought it would be a great, even necessary, addition. I estimated the size at about 20" x 8" (when he carries it to the truck it is indeed fairly slender). From some angles the grime from being handled by a mechanic is visible. Appears to have a silver or light colored handle. I scratchbuilt it in an evening, primed it and painted it the next day. The same day I scratchbuilt a crowbar, and added a hammer and a wrench that came with the two junkers from which this project began. The wrench was finished in Alclad stainless steel, then grime strategically added. All the tools were made to appear worn and heavily used. Finally all this was added to the wrecker bed, including an extra length of chain visible in the episode "Happy Birthday General Lee". -
Ultimate Cooter's Tow Truck -- WIP
Andrew D Charger Chaser replied to Andrew D Charger Chaser's topic in Hobbies
Dang that's funny! Okay, almost there...I learned the front bumper is probably made from quarter inch steel coated in thick black rubber. I also noticed there were two styles that showed up on the GMC truck in the series, again probably indicating two different vehicles masquerading as one for the filming. One of them was straight and flat, and the other curled around the corners of the fenders. I opted for the curled type. Made it from .020" plastic, carefully curled, then added three wire mounts, disguised from the front as the actual bolts that hold it on. Then added fake bolts for the rest. I tried to match the same pattern I saw in a couple of my photos. Then some drybrushing over the flat black with dark gray. Then the final touches with the antennae. The last one was the one that clips on over the driver's window. The aerial for that one was made from a bit of metal guitar string (the high E-string). The aerial on the tow rig is only slightly thicker, from a B-string. Also used B-string for the four other lengths of thin cable on the tow crane (totally different from the thick, braided tow cable). -
Ultimate Cooter's Tow Truck -- WIP
Andrew D Charger Chaser replied to Andrew D Charger Chaser's topic in Hobbies
Y'all are awesome cousins, and it's an honor to break bread with y'all at the family gatherings! Now gotta add the last of the lights. First the tow rig has six small rounded-rectangular position lights. To make them all as uniform as possible I made a master shape from styrene, then made impressions of it in moldmaking material. I made a lot of extras since I wanted a lot to choose from, and would only take the best 6. This ended up being a very wise move. Clear resin was poured into the mold impressions and thank God there were 6 decent ones to use from the resulting blob. They had to be right the first time since trying to clean up and reshape anything that small would be a nightmare. Now the grill/headlight assembly. Chrome was removed by soaking in bleach, and damage done by previous owner/assembler was repaired. Headlights were drilled out completely. Whole thing primed and painted in Alclad Stainless Steel (more of a workhorse appearance than chrome). New headlights fashioned from acrylic gemstones/rhinestones, with the facets sanded smooth and then polished to shine. The result is far more convincing than chrome headlights the same color as the grill & bumper. -
Ultimate Cooter's Tow Truck -- WIP
Andrew D Charger Chaser replied to Andrew D Charger Chaser's topic in Hobbies
Now for the rotating beacon atop the rig. Found something very similar from Tony's Custom Squads. Still needed some cleaning up, and the finish redone in Alclad Stainless Steel (although Polished Aluminum perhaps might have been a better choice). License plate was made by cutting a piece of aluminum turkey roasting pan to match the size of the license plate decal. Now for the rear view mirrors. I discovered from my photos that there were two similar yet different styles used, probably meaning two different trucks used for filming the series. I settled on one and started work. Once built and primed, they were finished in Alclad polished aluminum and Bare Metal Foil for the actual reflective surfaces. I definitely should have cleaned them up a bit more after priming.... -
Ultimate Cooter's Tow Truck -- WIP
Andrew D Charger Chaser replied to Andrew D Charger Chaser's topic in Hobbies
On to the actual tow cable. I was first referred to some braided metal cable produced specifically for modelmakers, but it was much too thick, and didn't coil around the spool at all. I found my answer in a picture hanging kit. The braided wire for hanging pictures on a wall was almost perfect in the smallest size, the 10-50 lb strength. I ran it through a candle flame to give it the appropriate worn/stained appearance. Next, some of the most critical scratchbuilding of the project, the sling. I tried various materials to simulate the heavy duty rubber straps, including black duct tape, black latex gloves and even bicycle inner tube. The latter had the perfect appearance but alas, was far too thick. I found the answer in black party balloons. The rounded part had too many curves to use, but the balloon necks had barely enough length of flat material. Add to that the chains on each side and the effect exceeded my hopes. On the end of the chains are hooks; these I made from reshaped sections of paperclip, then attached to the chains and painted worn dark metallic. After this I was VERY relieved and pleased with the result. -
Ultimate Cooter's Tow Truck -- WIP
Andrew D Charger Chaser replied to Andrew D Charger Chaser's topic in Hobbies
Y'all are 'way too kind...believe me I'm a mere mortal myself, just ask my sweetheart or anyone who works with me! Not sure about Hoss though... The red paint on the wrecker was going to be critical. It isn't regular red. Not only is it sort of a brick red color, but it's also stained and heavily sunbleached, giving a chalky appearance. You know, like playground equipment that gets sunbleached and then when you touch it you get white chalky residue on your hand? That's what it looks like. So. How to do sunbleached off-red without making it look straight pink? I started with a mixture of dark red, flat red and rust brown and sprayed everything in a base color. Then I used a mixture I came up with years ago that I call "Brick Red" and went over everything carefully, again. It's slightly lighter than the first color mix. Then I went back over it again with a VERY thinned mixture of light gray/off-white (36622 Camouflage Gray in military parlance, the color of the undersides of US warplanes in Vietnam). Then I went back with a wash of watercolor sludge (after this pic) and the result was almost perfect! Now to add the taillights. I made them using acrylic rhinestones/gemstones. Don't use glass ones, because the acrylic ones can be sanded to remove the facets and make them smooth once polished. Two were done in clear red, the other two left clear. -
Ultimate Cooter's Tow Truck -- WIP
Andrew D Charger Chaser replied to Andrew D Charger Chaser's topic in Hobbies
Much appreciated, thank you! And from what I can see, the proportions of your GMC look just about spot on! -
Ultimate Cooter's Tow Truck -- WIP
Andrew D Charger Chaser replied to Andrew D Charger Chaser's topic in Hobbies
Now for some of the lights. First the two rounded-rectangular rear-facing lights on the sides of the crane structure. I used acrylic gemstones, cut to shape, then the facets sanded out then polished smooth. Then the amber lights on top of the cab. I wouldn't mind cutting/sanding to shape some clear sprue for one or two, but there are FIVE of them. Trying to make five all identical that way is too much. So, I made one with scrap styrene, and used it to make a mold. From that I cast several identical in clear resin. Once cured they were cleaned up and painted with clear orange, with flat black at the bottom. Then, mounted on the cab. -
Ultimate Cooter's Tow Truck -- WIP
Andrew D Charger Chaser replied to Andrew D Charger Chaser's topic in Hobbies
Thanks y'all! Hoss, I commented on your thread, you've got some fantastic work going there yourself! Next was scratchbuilding the sling/cradle structures. Absolutely the best views of this came from the episode "Play It Again Luke." -
Hoss, these are great, really spot-on! Fantastic work, my friend!
-
Ultimate Cooter's Tow Truck -- WIP
Andrew D Charger Chaser replied to Andrew D Charger Chaser's topic in Hobbies
Scratchbuilding the winch was a challenge since a lot of it was guesswork. As far as the brace/frame (not sure the correct terminology), I discovered I didn't have to guess the width; apparently it should be the same width as the chassis frame, which makes sense from an engineering standpoint. Then, the more I built, the more extra details I'd discover in the photos. This was a long, long process. The tow booms were heavily modified from those in the MPC Datsun Monster Truck kit. Both ends were totally scratchbuilt to bring it all together, after careful study of my reference photos. The booms will be removable until after painting. The thin bar atop which will support the rotating beacon also has two round "shoulder" lights. These were made from slices from a clear styrene rod of the appropriate diameter. Wires were added from various thicknesses of copper wire. -
Ultimate Cooter's Tow Truck -- WIP
Andrew D Charger Chaser replied to Andrew D Charger Chaser's topic in Hobbies
Thanks Hobie! Looking forward to it! -
Ultimate Cooter's Tow Truck -- WIP
Andrew D Charger Chaser replied to Andrew D Charger Chaser's topic in Hobbies
The real nightmare of this project was the wrecker. I knew almost nothing about tow trucks, and there are no tow truck models or conversion sets for anything even close to this type. I was told it was a Holmes wrecker, in the 400 series....but amazingly, Google searches with that info yielded nothing! So I went the hard route. I went through countless Dukes episodes on DVD, pausing them to photograph any good views of the unit. Yep, that's right, I photographed the TV screen, and had photo prints made. The dozens of photos I took gave just enough reference material to build this. Although dozens of episodes provided good material, by far the most useful episodes were "Play It Again Luke" (S6 E15) and "The Fortune Tellers" (S6 E21). I was able to find sheet styrene with Diamond Tread pattern molded in. It was shockingly brittle, but I was able to fabricate the bulkheads and decking. I also used photoetched metal Diamond Tread for the curved wheel well tops and other details. Also detailed the rear with openings for the tail lights and more. -
Ultimate Cooter's Tow Truck -- WIP
Andrew D Charger Chaser replied to Andrew D Charger Chaser's topic in Hobbies
The entire chassis has a very toylike appearance, with almost every detail molded right on as one piece. So it was completely cut apart down to the basic frame and rebuilt. Front suspension was improved a bit, rear suspension completely rebuilt, and exhaust system with mufflers was scratch built. This would have to be mostly redone a second time when I realized the wheel base needed lengthening to accommodate the Holmes wrecker. I won't tell you what I said when I realized this.... The interior was made as dirty and grimy as possible, as a working country tow truck would be. Scratchbuilt CB radio installed. -
Ultimate Cooter's Tow Truck -- WIP
Andrew D Charger Chaser replied to Andrew D Charger Chaser's topic in Hobbies
There is a long out of production kit of a GMC pickup truck. I found one built junker on Ebay, along with a very similar junked Chevy pickup. Between the two junked models, I had enough salvagable parts to begin. The better of the two cabs was treated to multiple paint strippings and sanding. The engine was rebuilt, but without the air cleaner and upper parts; the hood will be sealed shut for this. An opening was made in the forward bulkhead to put a radiator, as it would be slightly visible with this type of grill. There is a ribbing pattern that should be on the rear of the cab. This area was thinned, then the ribbed pattern built with styrene. After priming it was airbrushed white and blue.